The MSSE office has updated our master templates and formatting guidelines to better
support you in writing your capstone paper.
We now offer four new capstone templates—Action Research, Science Research, Educational
Scholarship, and Journal Article—each with the correct chapter titles, improved automated
features, and corrected errors and inconsistencies. With these templates, your Table
of Contents, List of Figures, and List of Tables will update automatically, and all
elements now align with our formatting checklist.
The formatting checklist has also been revised with simplified step-by-step instructions,
screenshots, guidance for both PC and Mac users, and tips to avoid common formatting
issues.
To use the new templates, you will need to transfer content from the old version of
our template you have already been working in. We apologize for this inconvenience,
but hope that the updated templates and checklist will make final edits easier and
ensure your paper meets formatting and accessibility requirements for publication.
Transferring Text into A New Master Template
The video below shows what the process of transferring text from our old template
into our new templates will look like (as well as how new automated features work).
If your chapter also has tables or figures, view the next section and video as well.
Tables/figures need to be transferred separately.
The above video has no audio.
Please note the following while watching this video:
You will copy and paste your paper one chapter at a time into the new template.
For each chapter, copy only the body text—start below the chapter title and the very first heading directly underneath the title. Copy all other text through the end of the
chapter (including all other headings)
The chapter title and the very first heading directly underneath it are already correctly
formatted for you in the new master template
If needed, edit the wording of the first heading in the new template so it matches
your original paper.
Paste your content in the new template using the text-only paste option. Make sure you paste it in before the page break at the end of the chapter.
Fix the spacing and reapply heading and caption styles where needed.
Transferring Tables and Figures into A New Master Template
For chapters that include tables or figures, copy and paste the surrounding text as
described above, but do not include the tables or figures.
You will need to insert each table and figure where they belong separately. You can do this in different ways:
You can use the keep source formatting paste option to copy and paste each figure/table from your old document into your
new one. Make sure you still use the text-only paste option for all surrounding text.
Alternatively, you can insert your original table/figure files into the new master
template.
The video below demonstrates how to copy and paste a chapter that has tables.
The above video has no audio.
Note: Please make sure to view BOTH videos above. Depending on your version of Word,
your computer, and other variables, your content may require different formatting
adjustments once pasted. Common changes you will need to make are demonstrated in
these videos. Also, please be aware that these are meant to provide you with a general
overview only; in-depth formatting instructions are provided below.
General Tips for Formatting Success
Please remember to use the downloaded desktop version of Microsoft Word for your capstone
paper. Microsoft 365is available for freeto all MSSE students.
There are four versions of the master template, one for each capstone project option.
The chapters and some of the headings in each of these documents are different because
your paper content will vary based on the type of project you have chosen.
Please note that many required elements of your paper are already formatted for you
in these templates. Using one will ensure your paper complies with accessibility requirements.
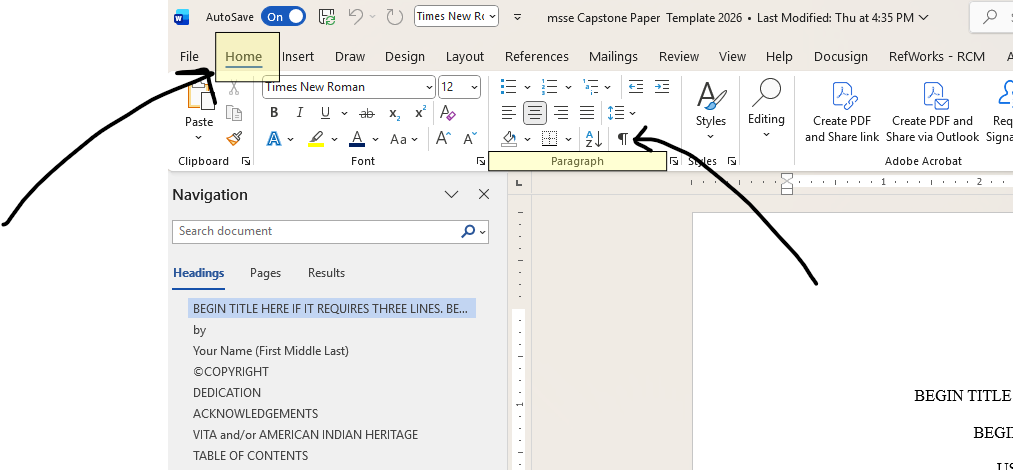
Click on the paragraph symbol, which looks like this: 
This will show you if you have any extra spaces where you shouldn't.
It will also show you the location of section or page breaks.
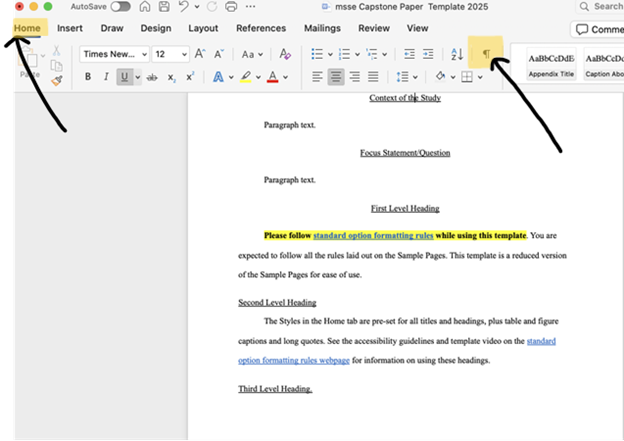
Note: The toolbar when using Microsoft Word on Mac computers looks slightly different,
but the directions above remain the same. Here is a screenshot of where this symbol
is in the toolbar when using a Mac computer:
Your front matter and end matter titles as well as your chapter titles are already
formatted for you in the master template. So are certain headings. However, you will
need to format additional first, second, and third level headings in the body of
your paper and all table and figure captions yourself.
Read directions on how to do this tailored to the type of computer you are using:
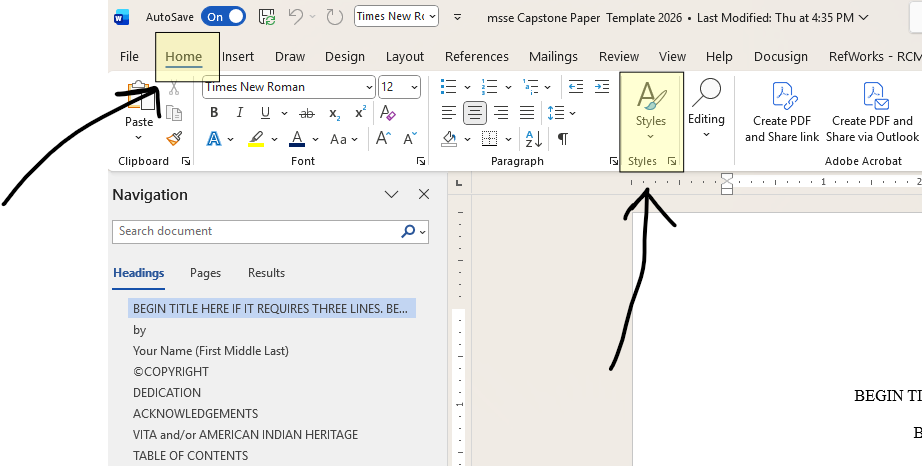
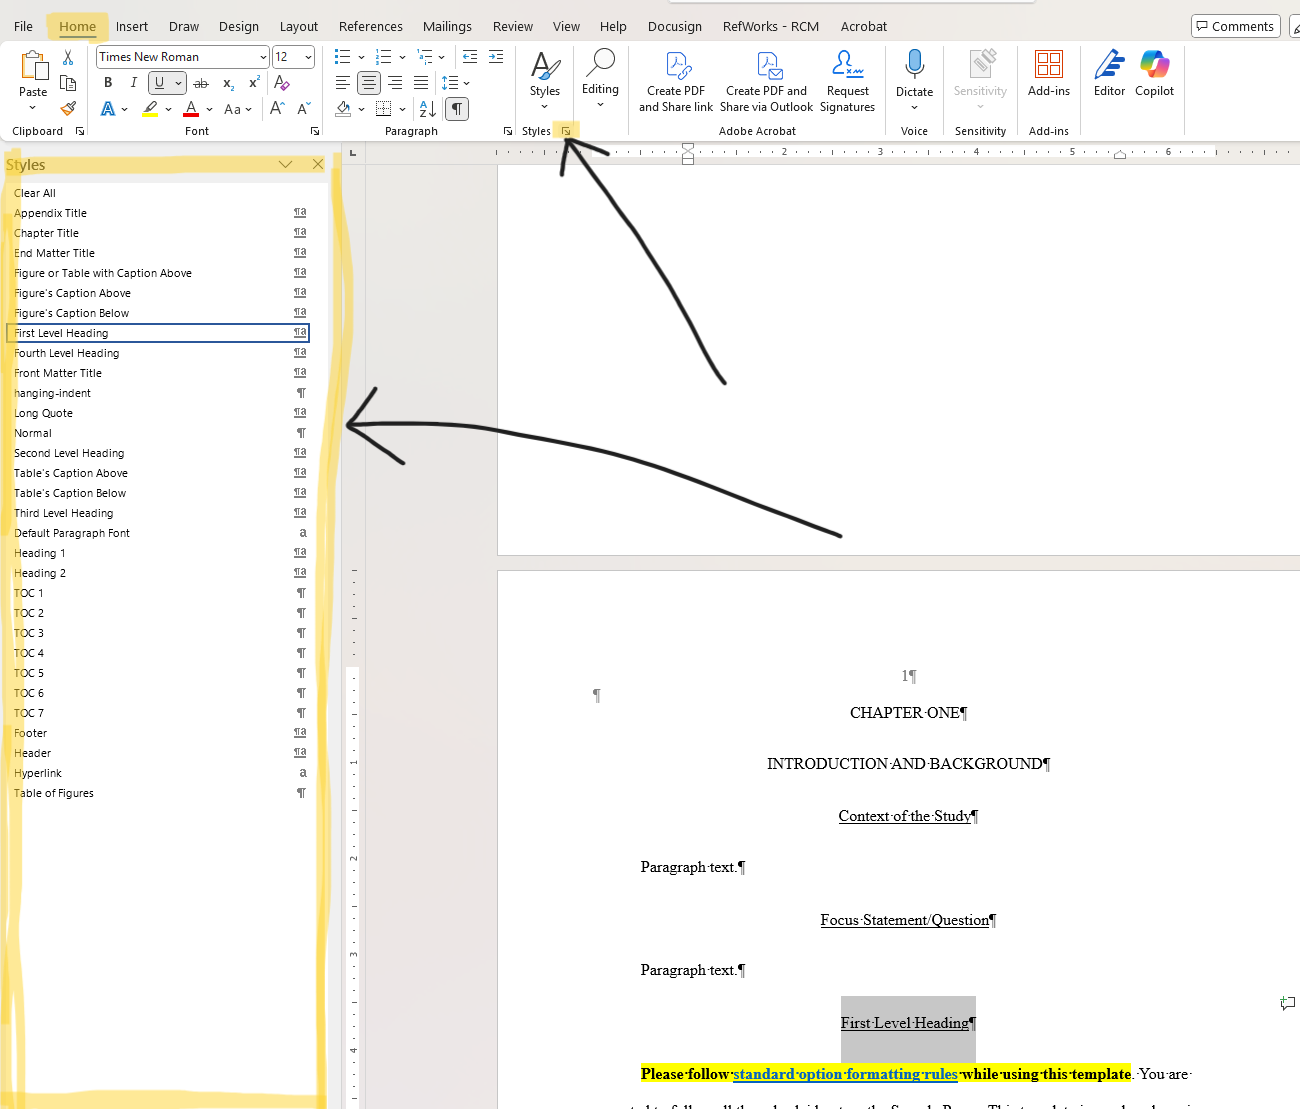
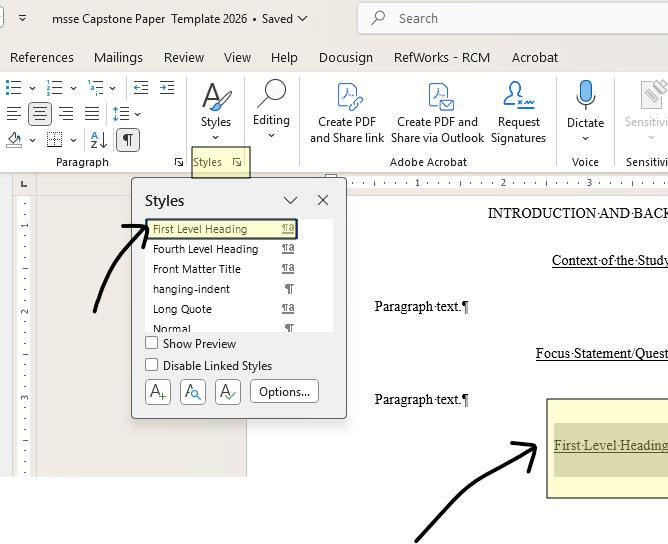
Select your heading or caption text within your paper.
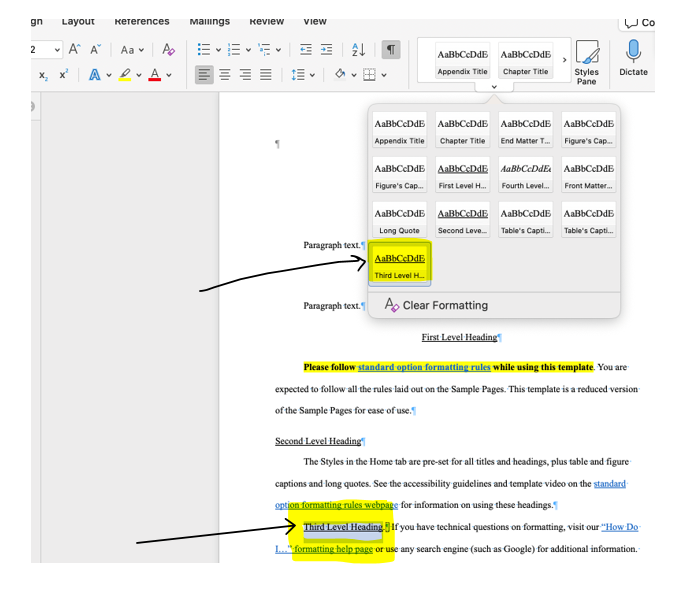
Go to the Home tab. Find the Styles section of the toolbar.
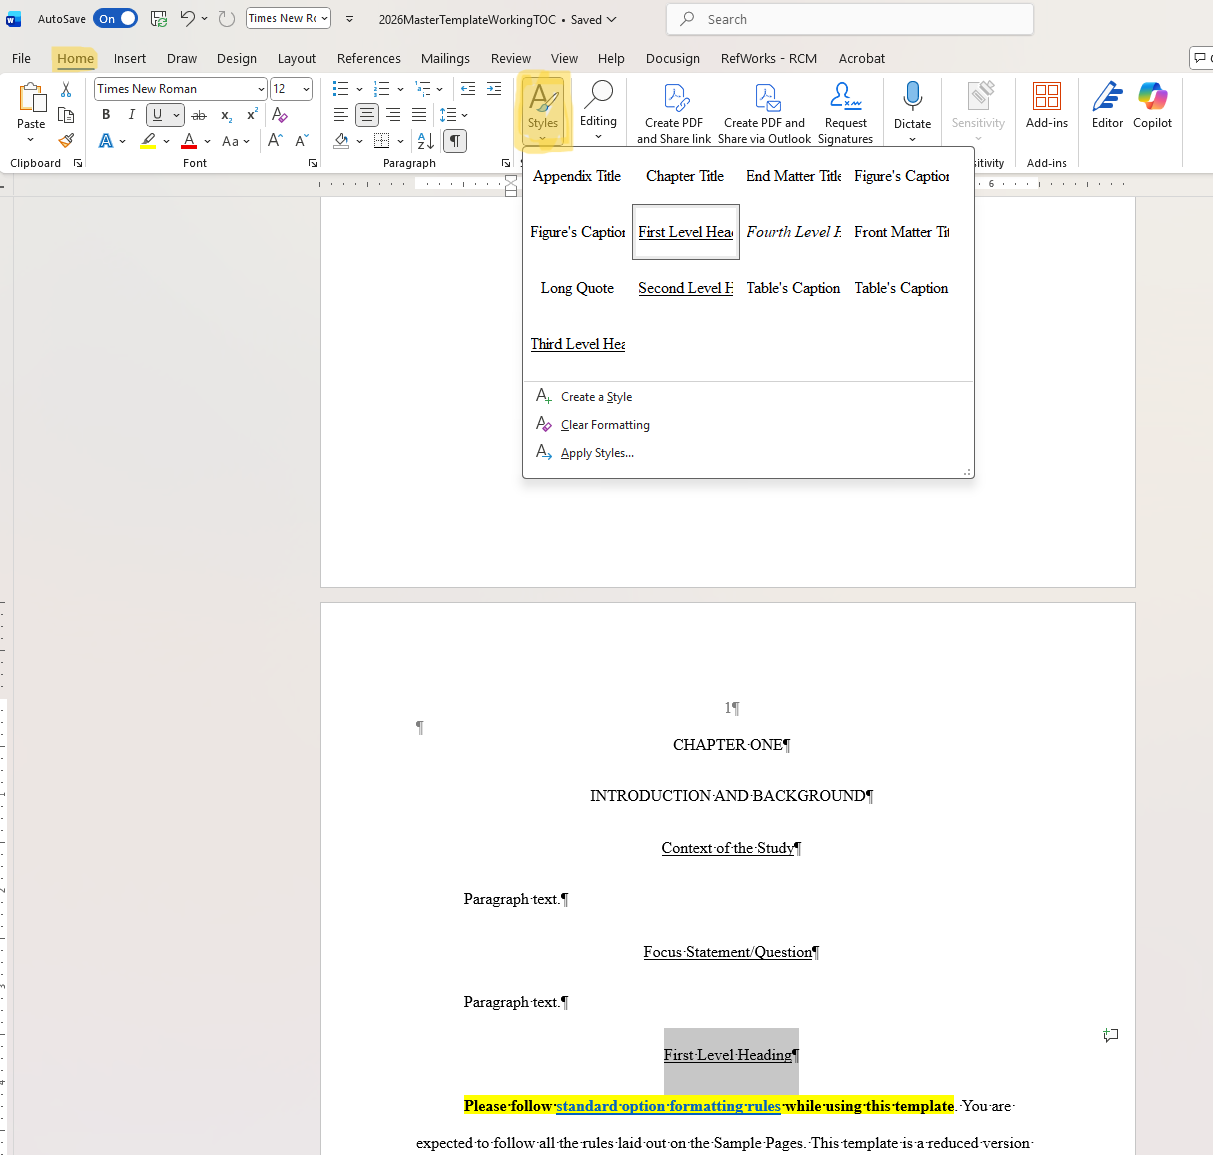
There are two ways to access the Styles menu:
Click on the Styles button where you see an A/paintbrush icon for a drop-down menu of style options.
Once you select a style, this menu will disappear.
Click in the bottom right of the Styles button and the same menu will appear at the left of your document. This menu will not disappear after you select a style unless you
close it.
Screenshots showing what these two options look like:
From the styles menu, select the "First Level Heading" style for your first level
headings, "Figure's Caption Below" style for captions below your figures, etc.
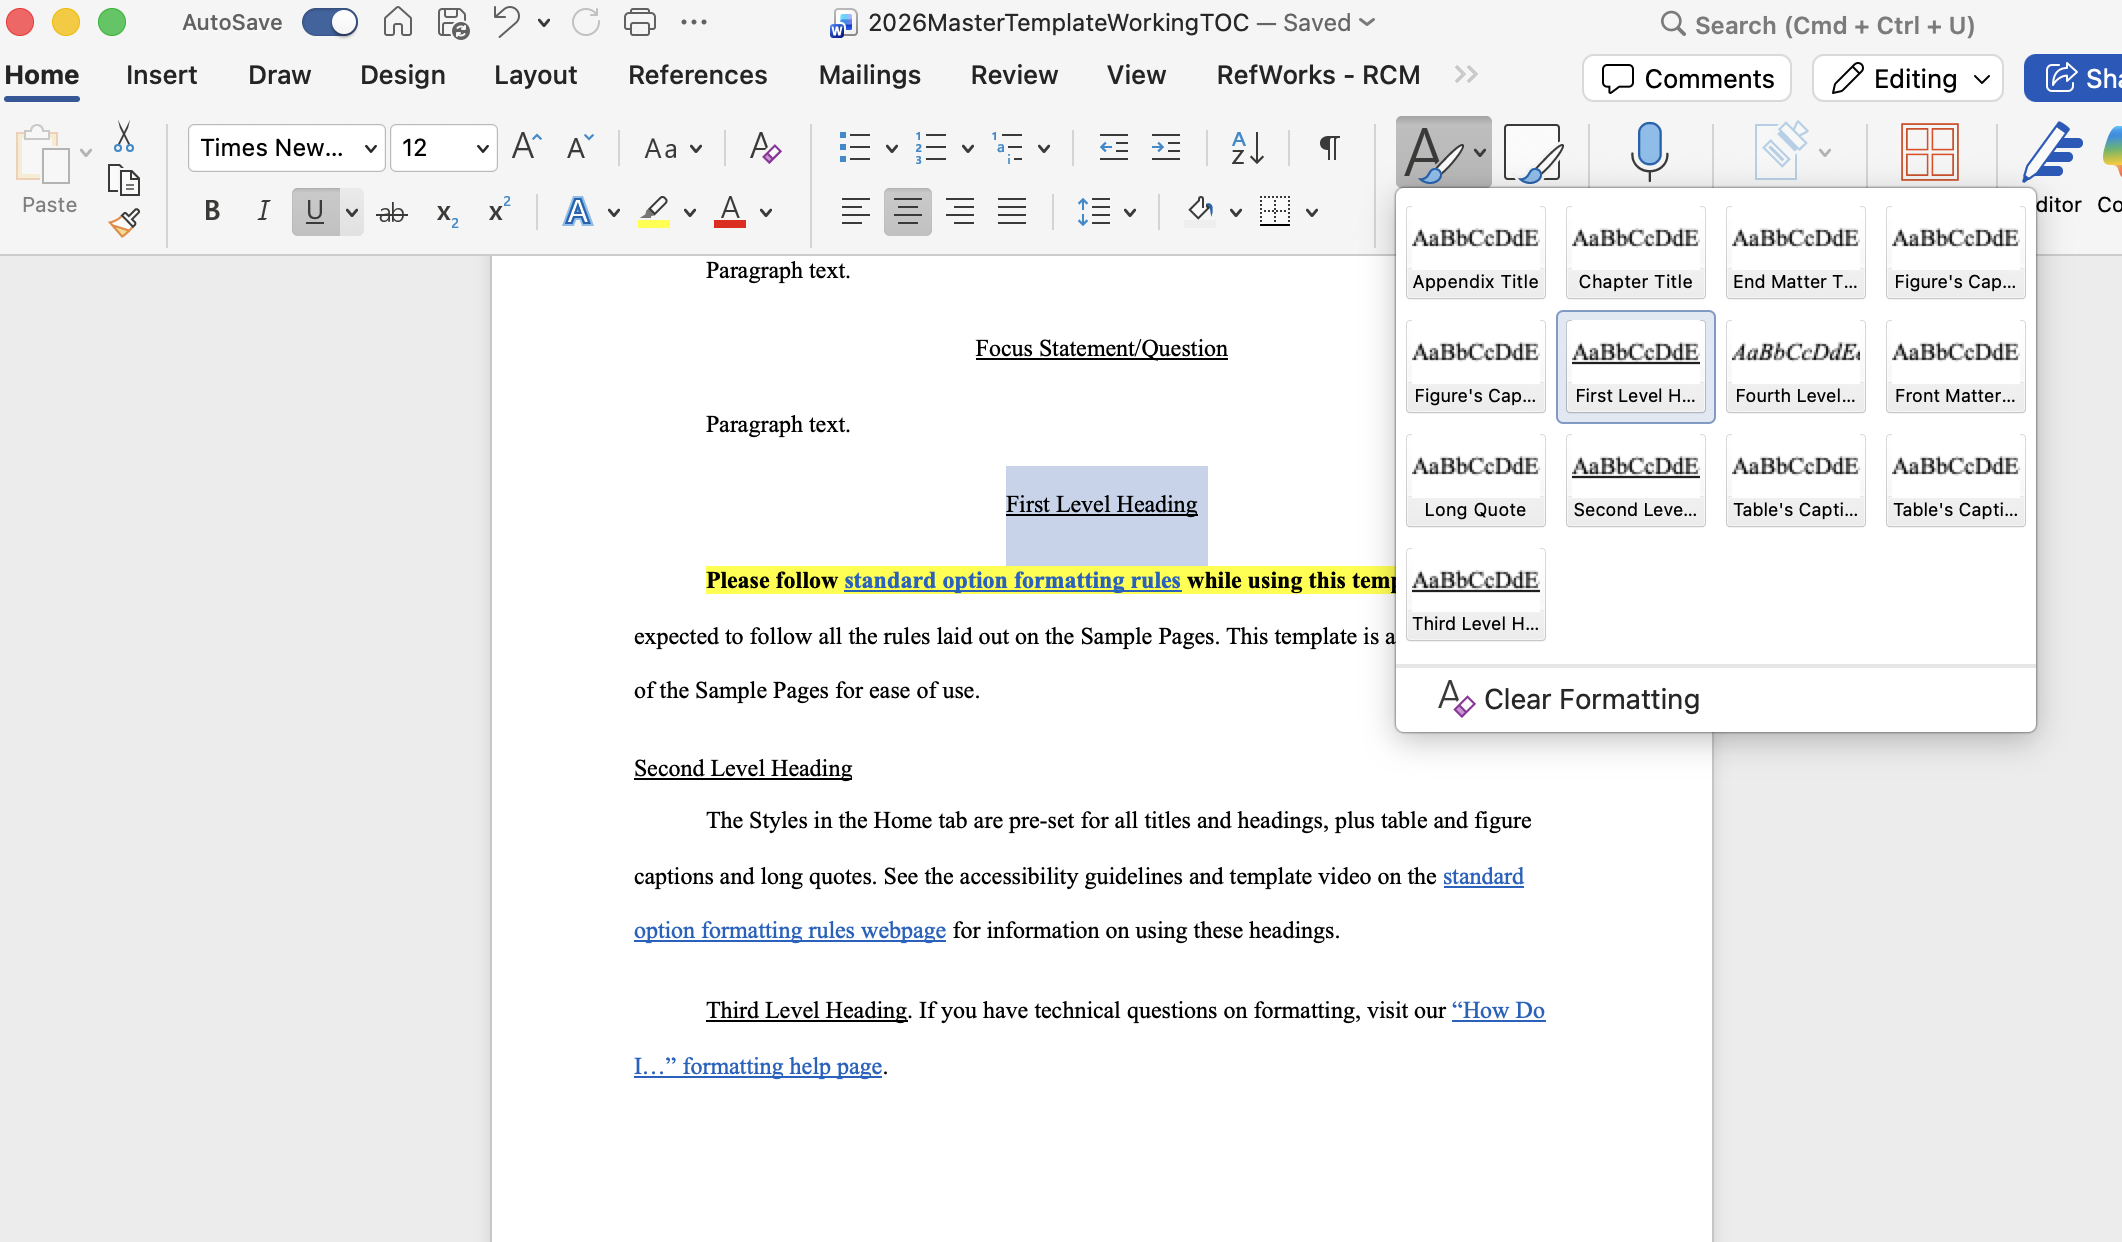
Select your heading or caption text within your paper.
Select the Home tab.
There are two ways to access the Styles menu:
Click on the Styles button to access a drop down menu. This will disappear after you select a style.
Select the Styles Pane button directly next to the Styles button for a menu that appears at the right of your document. This menu will remain after you select a style until you close
it.
Screenshots showing what these two menu options look like:
From the styles menu, select the "First Level Heading" style for your first level
headings, "Figure's Caption Below" style for captions below your figures, etc.
Using preformatted styles automatically creates the correct spacing for you.
Do not manually create your own headings/captions. This will cause issues as you later edit
your paper. Please use the preformatted style options.
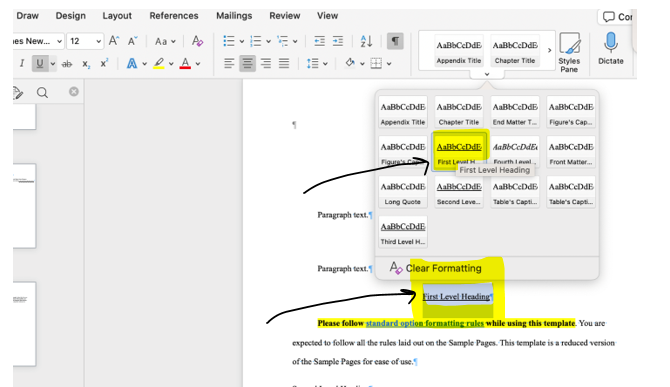
If you need to remove any style formatting, select the "Clear All" or "Clear Formatting"
option within the same Styles menu.
Occassionally, a style you assign to a heading or caption will be incorrectly applied
to the paragraph text that follows. Selecting that paragraph text and clearing the
formatting is how you would fix that.
When copying text from another document into an MSSE master template, always use the “Keep Text Only” paste option.
PC: Copy with Ctrl + C and paste with Ctrl + V. After pasting, click the clipboard icon and select “Keep Text Only”
Mac: Copy with Command + C and paste with Command + V. After pasting, click the clipboard icon and choose “Keep Text Only”
Using any other paste option may override the template’s formatting and cause automated
features to stop working.
Exception: Figures and tables should be copied and pasted separately from surrounding text using
the “Keep Source Formatting” paste option. You can also insert your original table/figure files into the document
instead.
Important:
Do not paste over chapter titles or the very first heading below the chapter title. Use
the existing title and very first heading below it that are provided in the master
template.
You may adjust the wording of the very first heading if needed
After pasting your text, apply the appropriate styles, spacing, and other formatting
as required.
Here are videos (the first made on a PC and the second made with a Mac) that outline
this process. Please watch both videos.
Formatting Checklist
Table of Contents
In the MSSE Master Template, the Table of Contents is automatic and will sync with your paper automatically after you update it.
Because of this, you will do the following:
You will skip the Table of Contents when first writing your paper
Return to it only after several chapters of your paper have been written and correctly
formatted
The Table of Contents will only work if you have correctly applied title/heading styles
in your paper where they are needed
After you have formatted several chapters of your paper, you can update your Table
of Contents (this will sync it with your paper)
Each time you add content or edit your paper, you should update your Table of Contents
so it reflects these changes
Do not directly edit your Table of Contents; you should only update it. All edits should be made in your paper.
The Table of Contents syncs with your paper after each update, so your paper needs
to be edited for changes to show up in the Table of the Contents. If a heading is
not appearing in your Table of Contents, for example, and you add it manually to your
Table of Contents, then after you update your Table of Contents that heading will
disappear. The reason for this is that the original error that led it to not be included
in your Table of Contents still exists in your paper.
What you should do instead is go back to your paper and check that the missing heading
has the right style applied to it. Then after you apply the correct style to that
heading and update your Table of Contents, it should appear after the Table of Contents
update.
All corrections must be made at the source of the problem, which is your paper.
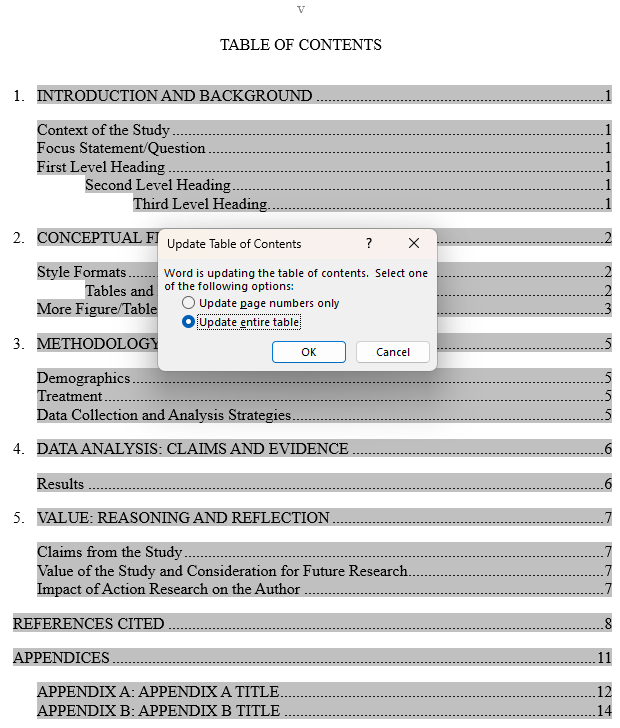
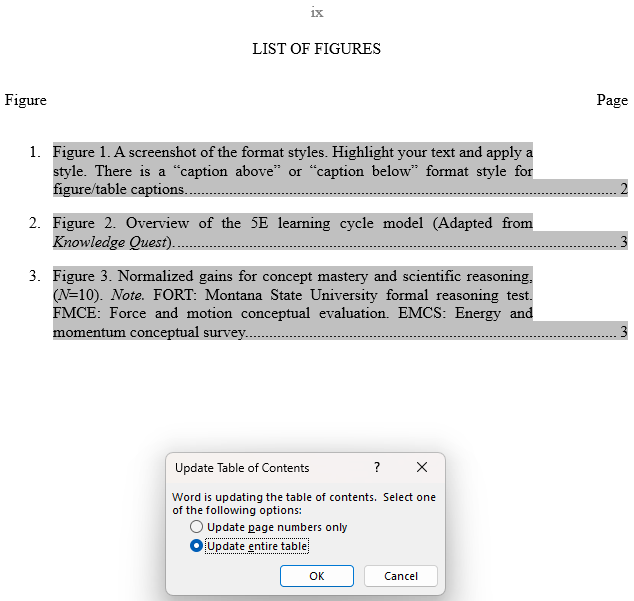
Follow the steps below to update your Table of Contents:
On a PC: Select the Table of Contents content so it is highlighted and then right click.
On a Mac: Press the Ctrl key and then click in your Table of Contents
Click the "Update Field" option in the drop-down menu that appears.
Select "Update entire table"
Your Table of Contents should now include all your chapters and headings and their
page numbers
See below for a screenshot of this process
Note: Sometimes, on a Mac, the Table of Contents will update immediately after you click
the "Update Field" option. Other times, you will need to follow the rest of the directions
above and select to update the entire table. Both of these work.
Use the Table of Contents as a quick way to verify your formatting—what appears (or does not appear) often indicates whether styles have been applied
correctly
If your Table of Contents includes text under headings that should not be there, check
the styles in your paper. This usually means a heading style was mistakenly applied to regular paragraph text.
If a heading is missing from the Table of Contents, return to your paper and check
that the correct heading style has been applied.
Confirm that there is a page break at the end of the page.
This page should include Roman numeral page numbers.
Important:Does your Table of Contents extend beyond one page? Click below for information on what to do next. (Ideally, this should be done as
a very last step when formatting your paper after your Table of Contents is finalized).
If you find that your Table of Contents extends onto a second page, you will need
to do the following:
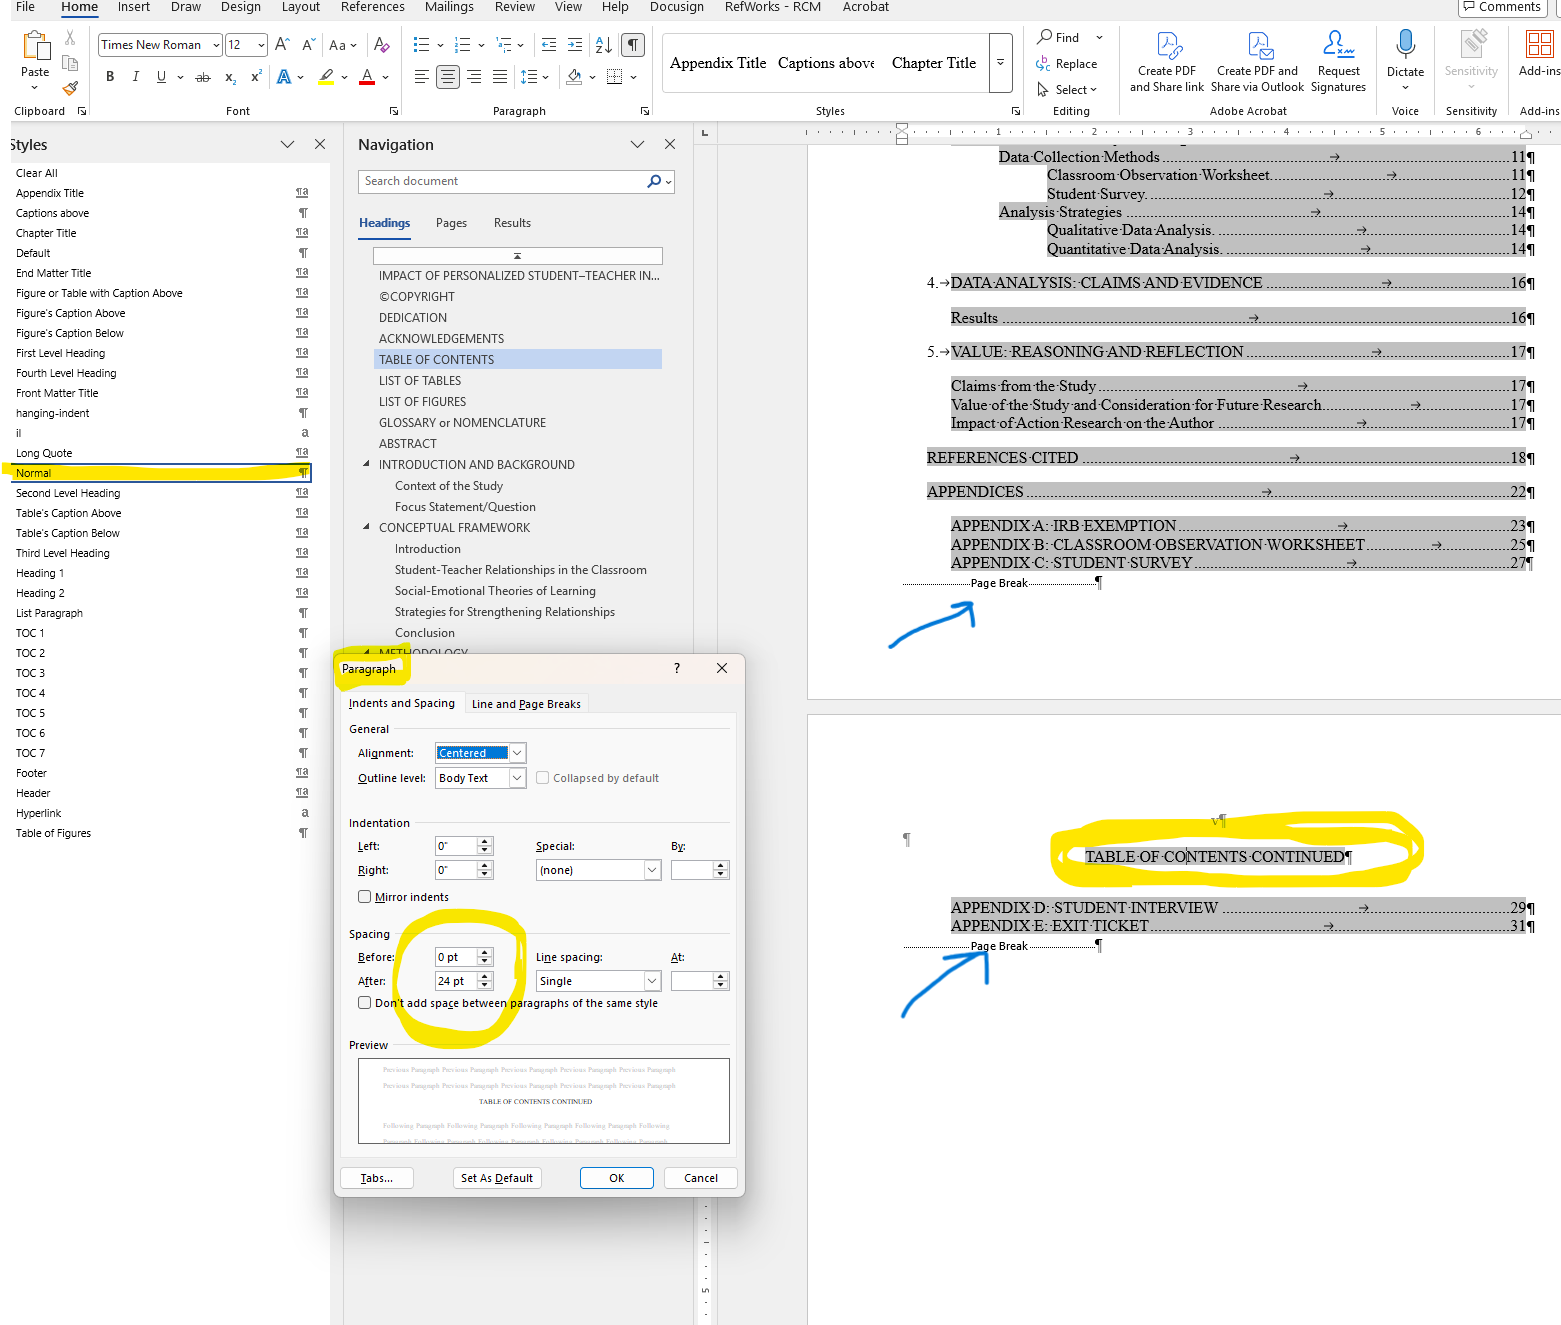
Copy the "Table of Contents Continued" title found in the next page of the master
template and paste it so it's at the top of this second page
Add a page break at the bottom of the first Table of Contents page (there should also
be one at the bottom of the second page).
Delete the original Table of Contents Continued page so the List of Tables replaces
it.
Here's a video showing these steps:
Note: If you do not do this as a last step during the formatting of your paper, when
you make more changes to your paper and then need to update your Table of Contents,
this Table of Contents Continued title will disappear.
If this happens to you, you will need to re-add the title using a different method.
In this case, please follow these steps:
1. Add a page break to the end of your first Table of Contents page.
2. Add this title in capital letters to the top of your second Table of Contents page: TABLE OF CONTENTS CONTINUED
Center this title.
Note: This title should be in normal style font. Please do not assign it any other heading style.
There should be triple spacing, or a 24 pt space set after this title to separate
it from the rest of your content.
3. Make sure there is a page break at the bottom of your Table of Contents Continued
page.
Here is a screenshot showing what your Table of Contents with a Table of Contents
Continued page should look like.
Note where there are page breaks. Also look at the spacing of the Table of Contents
Continued title and what style is applied to it (both of these are highlighted for
you in yellow).
Title page
Checklist:
Your title should be in ALL CAPS
You should have replaced the line that begins with "Your Name..." with your first,
middle, and last name
You should have replaced the line that begins with "Month and Year ETD is accepted..."
with just the month and year you submitted your paper (ex. August 2026)
Confirm that there is a section break after the paper submission date (This should
already be included in the master template)
Section breaks are indicated by two rows of dotted lines
Depending on spacing, it may or may not also say "Section Break (Next Page)"
Note: To check for a section break, you must have completed the third step at the
top of this page in the General Tips for Formatting Success section. This will reveal
hidden formatting symbols.
The title page should not have page numbers OR Roman numerals
Copyright Page
Checklist:
You should have replaced the line that begins with "Your Name..." with your first,
middle, and last name.
You should have replaced the word "Year" with the year you complete your paper
Confirm that there is a section break after “All Rights Reserved” (This should already
be included in the master template)
This section break is necessary for the Roman numerals that begin on the next pages
The copyright page should not have page numbers OR Roman numerals
Dedication, Acknowledgement, and VITA and/or American Indian Heritage Pages
You can include:
A dedication pageANDan acknowledgements page ANDa VITA and/or American Indian Heritage page
Some of these pages
None of these pages
These pages pages should begin your use of Roman numerals
This change to Roman numerals has already been set up for you in the master template
All you need to do is fully delete any pages you are NOT using (the title, paragraph
text, and page break)
Do NOT forget to also delete the page break of the page you do not want. This will
make it so that the next page's content will automatically move up to replace the
page you deleted
The Roman numeral for the first one of these pages that you include in your papershould be ii
You will not have an i page in your capstone paper
Your Roman numerals will be different depending on if you include all these pages,
only some, or none
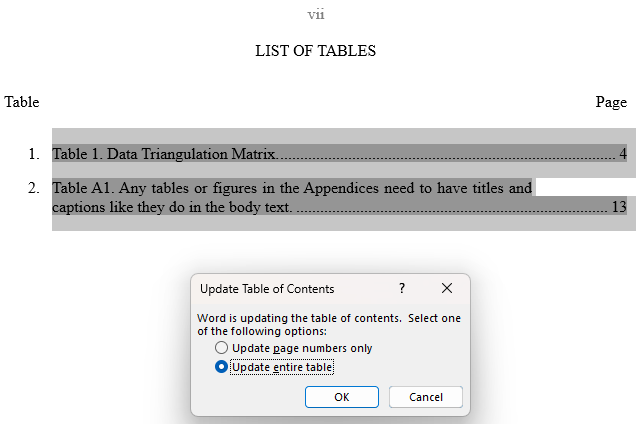
On a PC: Select the List of Tables content so it is highlighted. Right click.
On a Mac: Press the Ctrl key and then click in the List of Figures.
Click the "Update Field" option in the drop-down menu that appears.
Select "Update entire table"
All of your tables should now appear/update.
See below for a screenshot of this process.
Use the List of Tables as a quick way to verify your formatting—what appears (or does not appear) often indicates whether styles have been applied
correctly
If your List of Tables includes text that should not be there along with a table’s information, check the
styles in your paper. This usually means a caption style was mistakenly applied to regular paragraph text
If a table is missing from the List of Tables, return to your paper and confirm that the correct caption style has been applied to the table's caption
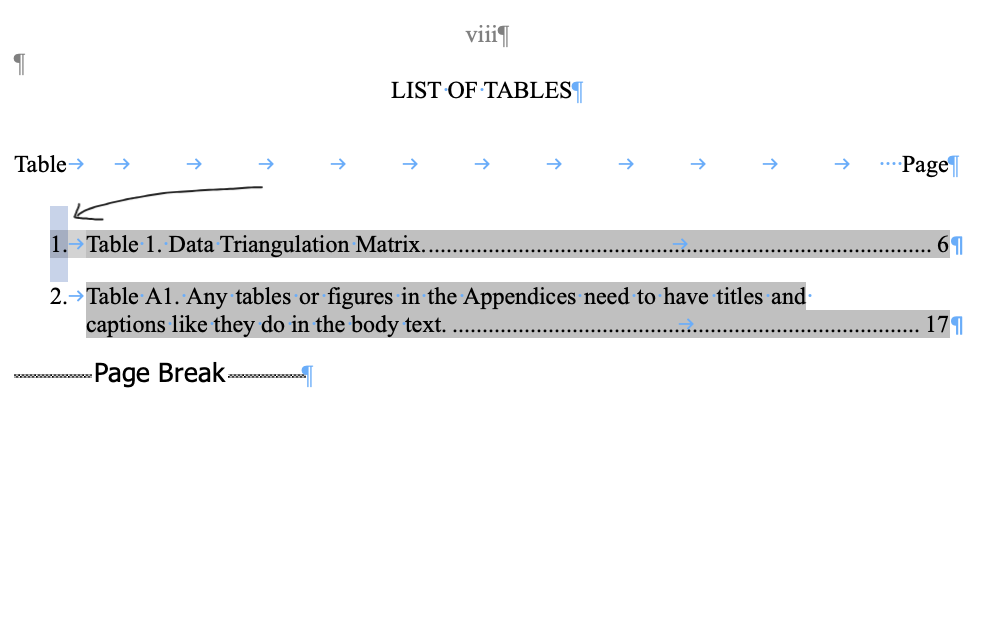
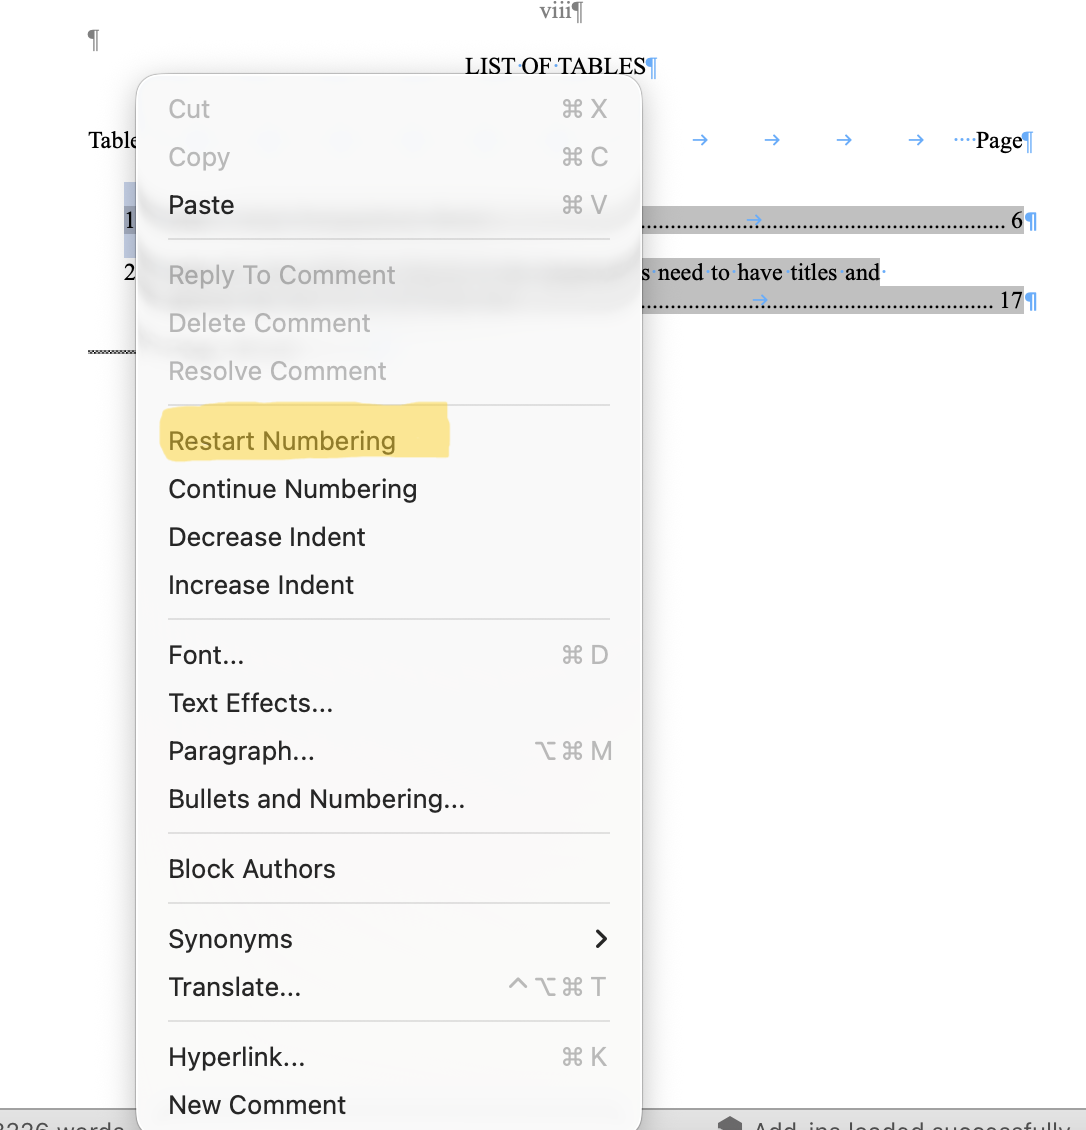
Important: Sometimes, the table numbers at the left of your List of Tables will become incorrect
after an update and start at a number other than 1. To reset these numbers, do the
following:
On a PC: Select the List of Figures content so it is highlighted. Right click
On a Mac: Press the Ctrl key and then click.
Click the "Update Field" option in the drop-down menu that appears.
Select "Update entire table"
All of your figures should now appear/update.
See below for a screenshot of this process.
Use the List of Figures as a quick way to verify your formatting—what appears (or does not appear) often indicates whether styles have been applied
correctly
If your List of Figures includes text that should not be there along with a figure’s information, check the
styles in your paper. This usually means a caption style was mistakenly applied to regular paragraph text
If a figure is missing from the List of Figures, return to your paper and confirm that the correct caption style has been applied to the figure's caption
Important: Sometimes, the numbers at the left in your List of Figures will be incorrect after
an update and start at a number other than 1. To reset these, follow the same steps
as given for this issue in the List of Tables section above.
This page should include Roman numeral page numbers.
There should be a page break at the end of the page.
Glossary or Nomenclature
Checklist:
Delete this page if you don't need it (you will need to delete the title, text, and page break).
Your glossary or nomenclature page should be single spaced with a double space between
entries.
This page should include Roman numeral page numbers.
Confirm that there is a page break at the end of the page.
Abstract
Checklist:
Your abstract paragraph should be single spaced and no more than 350 words.
The first line of your paragraph should start with one full indent.
The abstract must contain the following elements: (1) statement of the problem, (2)
procedure or methods, (3) results, and (4) conclusions.
Confirm that there's a section break at the end of the page.
This page still uses Roman numeral page numbers. New page numbers (1, 2, 3, etc.)
begin on the next page with the first chapter.
Roman Numeral Troubleshooting
In the process of editing the front matter of their papers, some students have found
that their Roman Numeral numbering becomes corrupted.
If all of your pages display "ii" at the top, please reference this section for assistance.
To fix this issue you will need to do the following:
Copy the "1" page number at the top of your Chapter One page.
Highlight the "ii" Roman Numeral at the top of the Dedication page and paste the "1"
you copied from your first chapter in there to replace it. Make sure to use the "keep source formatting" paste option.
It should automatically become a Roman Numeral upon pasting it at the top of the Dedication
page (however, it will become "iii" and not "ii").
You will need to adjust the numbering of the Dedication page so it no longer starts
with "iii". To do this, follow the below steps.
Double click on the "iii" Roman Numeral at the top of the Dedication page
Go to the Microsoft Word Toolbar and select the Page Number button
Select Format Page Numbers from the drop-down menu
Select"Start at" and type "ii" in the bottom section of the pop-up window that will appear
Click "Ok"
After updating the page numer on the Dedication page so it begins at "ii", the rest
of the front matter pages will also adjust accordingly, automatically.
Below is a video outlining this entire process:
Note: the above video has no audio.
Chapters
Note: You’ll want to reference the MSSE Capstone Paper Outlines below as you build
this section. Chapters will be different depending on the project type you choose.
Checklist:
In the MSSE master templates, chapter titles are already formatted for you on the
first page for each chapter. There are also examples for how you should format your
different headings and captions.
However, you will have to format additional headings and captions in the body of your
paper on your own.
In this and the following sections, you will find directions on how to apply each
type of heading formatting as well as how to format your table and figure captions.
For each of your first level headings, use the "First Level Heading" style option.
If you use the "First Level Heading" style, it will set correct spacing as well as
center and underline your heading for you.
All first level headings should be Title Case. Capitalize the first letter of each
word in the heading except articles, conjunctions, and prepositions.
Below is a screenshot showing how you would apply "First Level Heading" style formatting
to your first level heading text.
First, select your first level heading text.
On the Home tab, click on the "First Level Heading" style option from the Styles menu.
Screenshot of what this looks like on a PC computer:
Screenshot of what this looks like on a Mac computer:
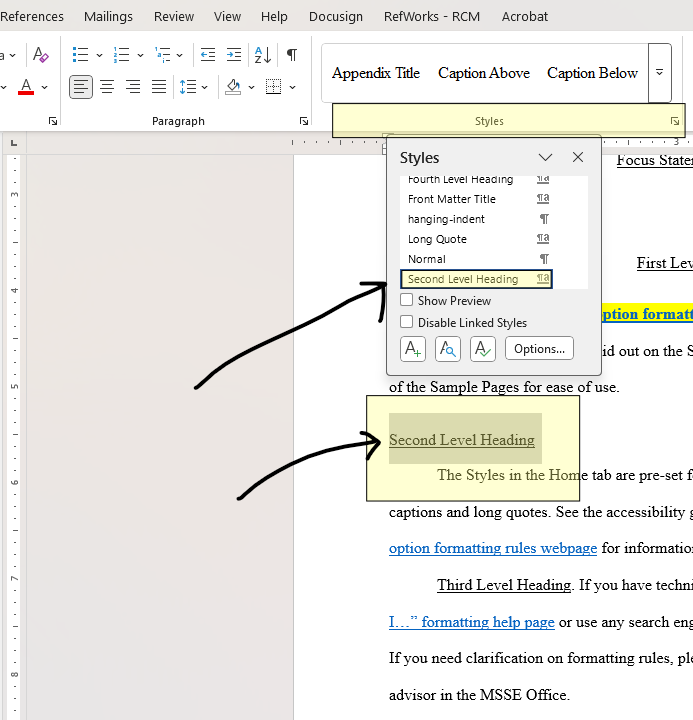
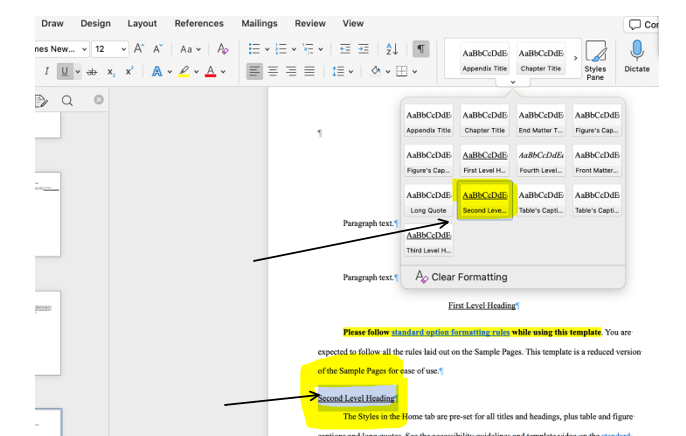
For each of your second level headings, use the "Second Level Heading" style option.
If you use the "Second Level Heading" style, it will set correct spacing, move your
heading flush left, and underline it.
You second level heading should be in Title Case. Capitalize the first letter of each
word in the heading except articles, conjunctions, and prepositions.
If your second level heading is too long for one line, it should automatically wrap
to the next line, single spaced. Make each line of a multi-line heading as equal as
possible and only underline the bottom line.
Below is a screenshot showing how you would apply "Second Level Heading" style formatting
to your second level heading text.
First, select your second level heading text.
On the Home tab, click on the "Second Level Heading" style option from the Styles menu.
Screenshot of what this looks like on a PC computer:
Screenshot of what this looks like on a Mac computer:
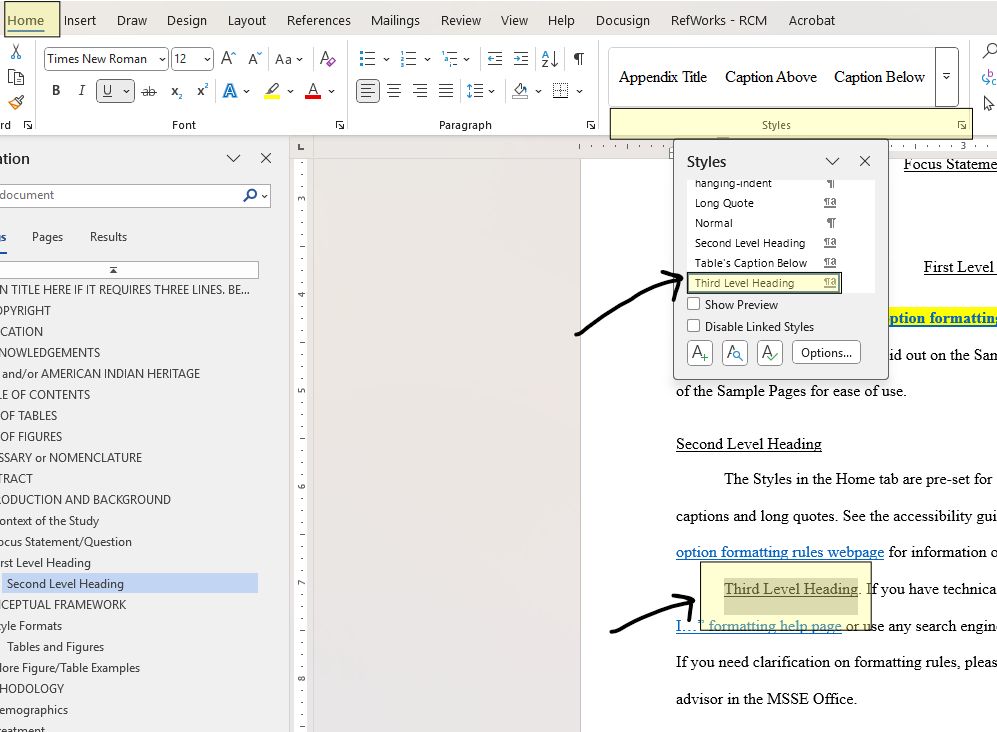
If you havethird level headings, use the "Third Level Heading" style option.
Third level headings are trickier than other level headings.
All third level headings should be one full indent, underlined, and have a period
at the end. You will have to add the indent yourself.
All text immediately starts after the period on the same line as the third level heading.
Below is a screenshot showing how you would apply "Third Level Heading" style formatting
to your text.
First, select your third level heading text.
On the Home tab, click on the "Third Level Heading" style option from theStylesmenu.
Add an indent.
Make sure the text following your third level heading begins directly after the period.
Screenshot of what this looks like on a PC computer:
Screenshot of what this looks like on a Mac computer:
The chapters of your paper start your use of Arabic numbers (1, 2, 3…).
Make sure there are page breaks at the end of EVERY chapter and NO page breaks within ANY chapter.
Page breaks have already been added for you for each chapter in the master template.
However, if for some reason you need to add a page break that was accidentally deleted,
you will need to follow the steps below.
Direct quotes of four lines or more must be single-spaced and “blocked.” This means
the text is indented on both sides and is justified.
To do this, follow these steps:
Select your four or more lines of text
Go to your Styles options and select and apply "Long Quote" style formatting
This will automatically format your block quote text for you
Figure Captions
Sample Size:
UseNwhen you are talking about your entire sample. Usenwhen you are talking about a subset of your sample.
Note: N and n are always itallicized.
Checklist:
Make sure that your figures are in correct numerical order throughout the paper.
Here is an example of what a figure caption should look like:
Figure 3. A screenshot of the format styles, (N=19)
Pleasedo notitalicize Figure 3.
Your figure caption should appear directly under or above the figure without any extra spacing.
Be consistent with which caption style you use throughout your paper (either above
or below).
To put captions below, use the "Figure's Caption Below" style.
To put captions above, use the "Figure's Caption Above"style.
Sometimes, extra spacing will appear when using caption styles. If this happens, you
will have to adjust it.
There should be triple spacing to separate figures and their captions from the surrounding paragraph text.
There should also be triple spacing between figures that come right after one another.
If you are having difficulty with triple spacing, try to visualize having two blank
lines of text separating your paragraph text from figures and their captions. Your
curser is approximately the size of one line of text. This video may help you visualize
this:
Make sure your figures are within the page margins.
Table Captions
Sample Size:
UseNwhen you are talking about your entire sample. Usenwhen you are talking about a subset of your sample.
Note: N and n are always itallicized.
Checklist:
Make sure that your tables are in correct numerical order within the paper.
Here is an example of what a table caption should look like:
Table 1. Physical characteristics and trout of watersheds sampled in the headwaters
of the Colorado River, (n=11).
Your table caption should appear directly under or above the figure without any extra spacing.
Be consistent with which caption style you use throughout your paper (either above
or below).
To put captions above, use the "Table's Caption Above"style.
To put captions below, use the "Table's Caption Below" style.
Sometimes, extra spacing will appear when using caption styles. If this happens, you
will have to adjust it.
There should be triple spacing to separate tables and their captions from surrounding paragraph text.
There should also be triple spacing between tables that come right after one another.
Do not include bold text in any of your tables.
Make sure you use Sentence Case text except when referring to names, places, or instruments
in your tables.
If your table spans multiple pages, do not divide it between the pages in the middle
of a cell. Make sure the last row is completely on the previous page before continuing
with the following row on the next page.
References Cited
Resources:
According to the 7thedition of APA, you should:
include the names of up to 20 authors for references who have 20+ authors (1:00 in this video)
include the website name unless it is the same as the author name (1:25 in thisvideo)
Checklist:
The title REFERENCES CITED should be centered and appear almost in the middle of the
page (this has already been done for you in the MSSE master templates).
There should be a page break after REFERENCES CITED (again, this has been added for
you).
Start all references on the next page. You will not include a title at the top of
this page.
References should be single spaced with a double space between references. See below for more information on double-spacing.
In Word: For double-spaced lines, under the Paragraph setting, set your Line Spacing
to 2.0 and make sure the spacing before and after are set to 0 pts.
Another way to think about double-spacing is that there is a 12-point space between
lines as shown in this visual borrowed from the Graduate School:
If a reference goes on to the second line, a word hanging indentation should be present
on the second line.
You’ll do this by putting your cursor in front of the first word on the second line
and hittingcontrol+t or command+ton your keyboard.
References should be in alphabetical order.
Appendices
Checklist:
The word APPENDICES should be centered and appear in the middle of the page (this
has already been done for you in the master template).
Check that there is a page break after the word APPENDICES (again, this has already
have been added for you).
On the next page, "APPENDIX A: APPENDIX A TITLE" should appear almost in the middle
of the page.
You should have replaced the text "APPENDIX A TITLE" with the title of your first
appendix.
Check that there is a page break after the appendix title.
The next page(s) should contain the content for Appendix A.
Make sure there's a page break after the Appendix A content.
You’ll follow the same steps for the rest of your appendices (Appendix B, Appendix
C, Appendix D, etc.).
Note: Within your paper, all appendices must appear in the correct alphabetical order.
Appendix A (the first appendix in your appendices section) would also be the first
appendix that is mentioned in your paper. Appendix B (the second appendix in your
appendices section) would also be the second appendix that is mentioned in your paper,
etc.
If you have only one appendix, formatting rules are slightly different. See the MSSE
master template for further details.
Reference checker(run this when you’re close to being done with your paper)
In-text citations can be naturally integrated into a sentence or placed in parenthesis.
In the first case, they are referred to as narrative in-text citations. In the second,
they are called parenthetical in-text citations.
Narrative: Walker(2007) found a link between student engagement and academic achievement.
Parenthetical:There is a link between student engagement and academic achievement(Walker, 2007).
Examples of In-text Citations:
One Author
First narrative in-text citation:Walker (2007)
First and subsequent parenthetical citations:(Walker, 2007)
Two Authors
First narrative in-text citation:Walker and Allen (2004)
First and subsequent parenthetical citations:(Walker & Allen, 2004)
Three or More Authors
First and subsequent narrative in-text citations:Bradley et al. (1999)
First and subsequent parenthetical citations:(Bradley et al., 1999)